This tutorial shows how to build a foam mold in order to laminate a chair back using the Thin Air Press. Building a mold using foam is an inexpensive alternative to making a mold from multi-layers of plywood. A good thing is that the material is inexpensive and the mold is completely re-usable many times over!

Tools needed
Sharp knife
Builder’s square
Tape measure
Masking tape
Jig saw, handsaw or bandsaw
Thin Air Press
Long wooden sanding block
Materials needed
Veneer (I use 1/16″ maple veneer)
Glue
Pink insulating foam, 2″ thick
Sandpaper, 100 grit
Spray adhesive or water based contact cement
Step 1: Setup
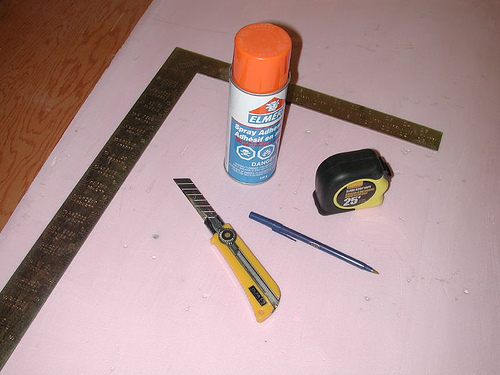
This picture shows the tools you will need, including the rigid foam for this project. The foam is 2″ thick and is used primarily for insulating homes. It can be purchased at most building supply outlets. Look for the highest R rating for this material. An R rating of 10 is preferred. A builder’s square, sharp knife with a long blade, tape measure, spray contact cement (or water based contact cement) and pen are needed for building the mold.
Step 2: Getting Started
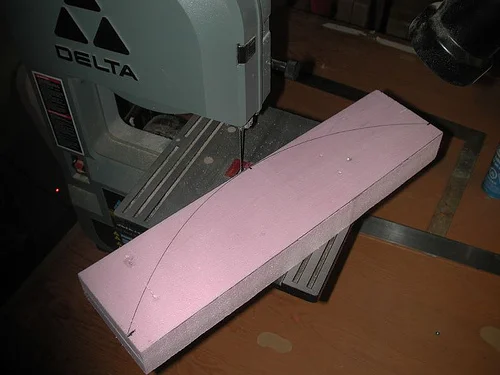
On a piece of heavy card draw out the profile of your form. This will give you an idea of the size you will need to cut your foam into. Mark out enough rectangles on the foam to stack the pieces together, one on top of another to create the width of your mold. Cutting them a bit oversized is advisable at this point.Depending on how large and wide the mold you are building is, it should look something like this:


I used a bandsaw for the cutting stage but a long blade utility knife will work just as well.

Here are my pieces cut to rough size.
Step 3: preparing your Shape
Using the card paper template, draw the outline of your final shape onto the foam. Repeat this step on all of the individual pieces. The next step will be to glue the pieces together. Make sure you end up with template marks on the outside of your foam mold after stacking the pieces together.
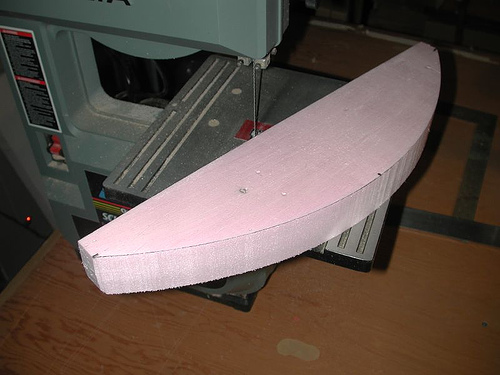
On each piece, bandsaw the foam on the outside of the line. Do not cut right on the line. Leave extra material.

Stack all your pieces together making sure each piece is aligned with the other on the bottom and one edge. Using a builder’s square will help.
Step 4: gluing

Once you have them aligned and know they fit together properly, use contact spray adhesive or water based contact cement to glue them together. Spray all the sides that will you want attached. Wait a couple of minutes before joining the pieces.

Once attached, find a length of wood wider than what your mold is (as shown here). Glue a piece of 100 grit sandpaper to one side of the wood. Use this to sand across the top of the mold, never sanding below the template marks on either side of the foam. Only sand across the form, as sanding along the length could produce a hollow in the mold.

While sanding, constantly check with a steel straight edge to make sure your mold remains flat across the form.
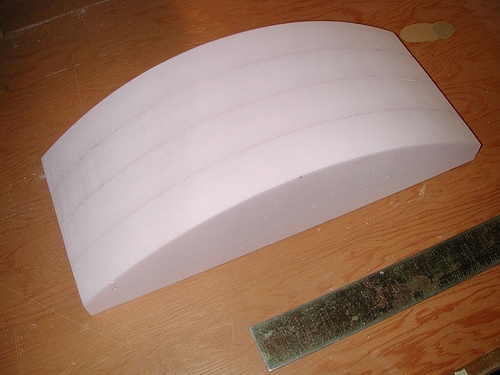
This is what the finished form should look like:
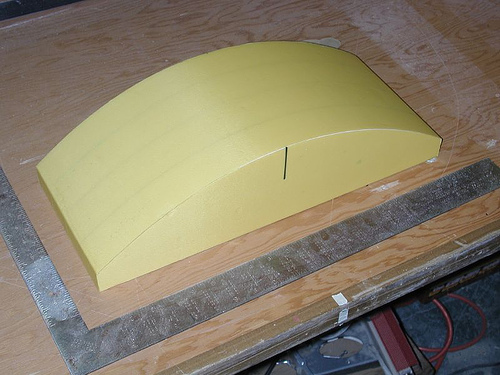
I have added some yellow sticky-backed cloth to the mold but this is not necessary. Notice the center mark, as it is important to help align the veneers while doing the pressing.
STEP 5: Prepping your workspace
It is time to prepare your workspace. There are many ways to press your veneers onto your substrate material. Cauls and clamps work well. You can invest in an electric vacuum pump and bag system for vacuum veneering, or you can use the Thin Air Press kit from Roarockit. Whatever you use, make sure you are familiar with the process before proceeding. Doing a dry run without glue is always advisable when pressing veneers. Have all the parts ready, including the glue, veneer, roller and in this case, the Thin Air Press vacuum bag, breather netting and finally, the manual vacuum pump. Set everything up to be close at hand when you begin your glue up as you have limited time for applying the glue before it starts to dry
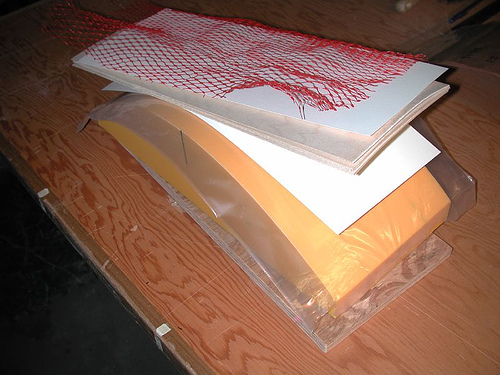
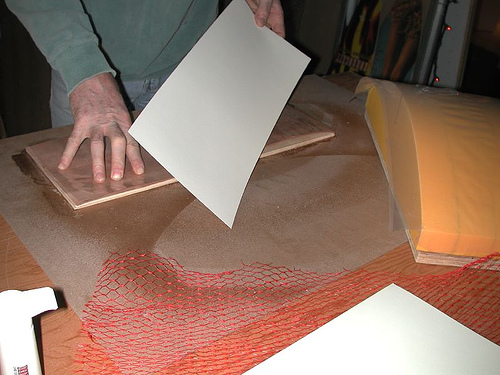
I pre-cut 5 layers of 1/16″ veneer. Your laminating material can be any variety of material, from tempered masonite, to 1/8″ door skin material. The rule of thumb is, if you can manually bend one sheet of material over your mold you can bend multiple sheets using the TAP kit. I have placed a layer of polyurethane plastic (plastic garbage bag will work fine) over the mold to protect it from glue.

step 6: Choose your glue:
There are many types of glue that you can use for veneering. You want a glue that advertises a long wet time. Epoxy glues, (like West System) work well and have the advantage of not swelling veneer like water-based glues. Unfortunately epoxy is fairly pricey and toxic smelling while curing. Water-based glues, like woodworker’s glue, work well for veneering but special consideration has to be taken for veneers expanding because of the water in the glues. I use Titebond III for glue as it has a long open time of 9 minutes. This gives you plenty of time to get your project glued and into the bag before the layers of glue start to dry. Even coats of glue are a must! Use a small, close-napped roller for this step. A quality polyurethane glue will also work for this project.

Step 7: the glue up
Stack one layer on top of another while gluing as this will help slow the drying time of the glue.
For this project I inserted a loose piece of styrene as a caul (or platen). This was to prevent any bubbling of my veneer in case I applied too much glue. If you are careful and evenly spread the glue, it is not necessary, especially if you are using 1/16″ material.

Lay or wrap the breather netting over top of the laminates to allow even evacuation of the air from the TAP bag while pressing
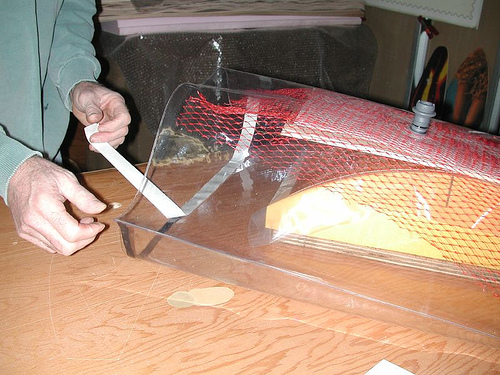

The next step is to peel the paper from the sealing tape and to pull firmly on either side of the TAP bag, stretching the bag flat along the sealing tape. Take your finger and carefully press the sealing tape to the vinyl TAP bag. As you do this try to work from the inside of the bag towards the outside. Look for any light colored areas where the tape is not firmly pressed down. These will be very visable and only need a little thumb pressure to remove them. Here is a video of this procedure
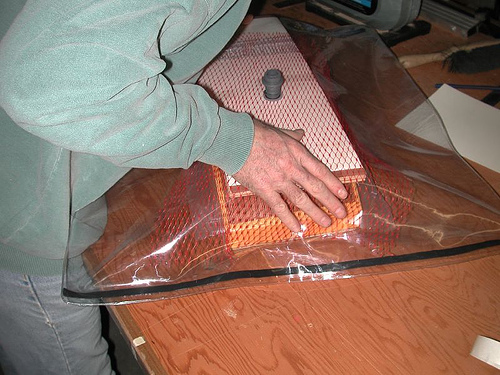
Make sure your veneers are centered on top of the foam mold. You can still move things around in the bag even when sealed
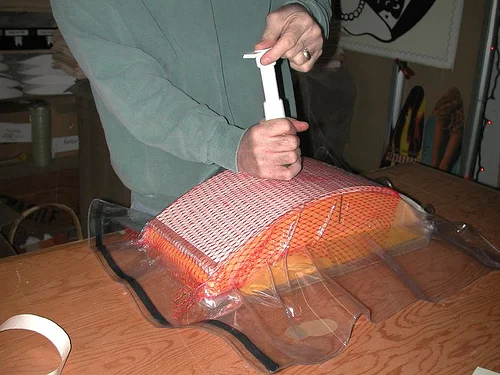
Now press the pump against the grey one-way valve and remove the air from the TAP bag. Because the form inside the bag is flat, it should take less than one minute of vigorous pumping using the TAP kit’s manual vacuum pump. You have achieved maximum vacuum when you feel the handle on the pump hard to pull and you can not pull the vinyl away from your project. This will create over 13 lbs per square inch. With a project this size, there will be over 2000 pounds of pressure evenly pressing down on your veneers. This is more than enough pressure to press any veneered project.

Step 8: Check your work
In a few minutes, check to see if you have any leaks along your sealing tape by pulling at the edge of the vinyl. If the vinyl pulls away from your project, look at the sealing tape for any light colored areas and use your thumb to press these out. Once done, you can re-pump your TAP bag. The process is very simple and if you follow the basic instructions, the TAP bag will maintain vacuum for as long as it takes your glue to dry. I leave a project like this in the TAP bag for at least 8 hours. Check to see what the glue instructions say to be sure, as some glues take longer than others to set.
After the glue has dried you can remove your project. The paper strip that you removed from the sealing tape should be placed back onto the tape when you open up your bag. Do this before you remove your project as it prevents any flakes of glue from getting onto the sealing tape while removing your project. The sealing tape is re-usable many times over as long as you keep it clean.

Here is the pressed piece. There is very little spring-back when veneering multiple layers of veneer together and the more layers of veneer you use the stronger your pressing will be.
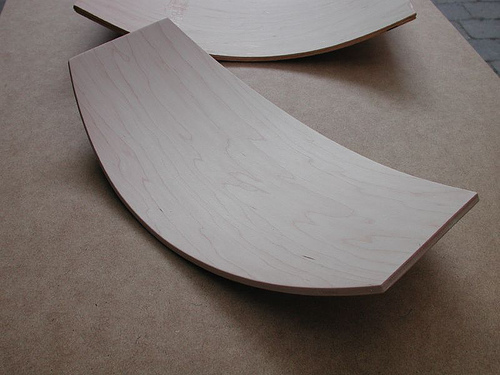
This is the finished back, band-sawed out and sanded!
This project took only 4 hours to complete. I spent most of the time building the foam mold as I wanted it to be very accurate. I think the overall look of the chair back looks great! It was a fun and easy-to-do project!
 Thin Air Press Kit 26x28"
 Titebond III glue (1 gallon)